step one - off the rocker

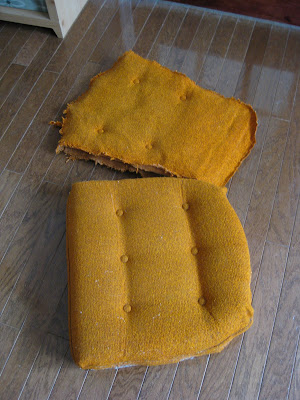
step two - tear off those old cushions, easy enough

put these to the side so I can measure the new fabric to fit around pillows. I removed the buttons and old fabric. The foam and box / springs in the bottom seat and seat back was still in good shape.

yeah, now contemplate all the little staples to remove with pliers


This is where there are not more progress photos, because in a crazy act of lunacy I can not put off this project until after my back surgery on Friday, so in between laying on my couch on the heating pad I sit up in a comfy chair in my living room and take out all the tacks.
Then after another break I pull the chair out to the garage to begin spray painting. I am to lazy to sand or anything, but basically just wipe off the wood frame with baby wipes. Then 2 coats of Krylon ivory spray paint from Wal-mart. The lighting is bad in these next pictures, but really it probably needed another can of spray paint too. I did not even turn over the chair to get all the crevices and under side - it's ok I tell myself, I am going for the shabby chic look, right?
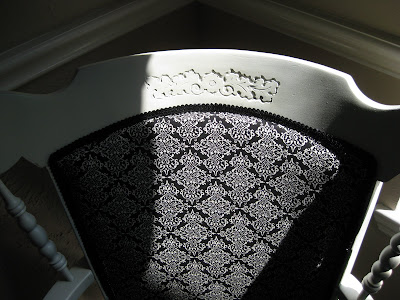
So after the spray paint dries a little I start stapling away at the recovered pillows. This was pretty easy - the chair had a groove around the back and I just pulled the fabric into there and stapled around and made sure the pattern was mostly straight. Then I hot glued some black trim around so the staples are all concealed.
Put the base cushion back on and screwed it in.
Paid $10 at garage sale, about $10 on fabric and trim supplies from Hobby Lobby, $5 on spray paint. $25 for a "custom" office chair Tools needed - screwdriver, pliers, staple gun, hot glue gun
playing around with my camera software here is the before / after
playing around with my camera software here is the before / after


I am now on my back recovering from the surgery, so definitely no more projects for a while, but I am set up on the lap top and bookmarking ideas!
editing to add one more picture of the chair from the back


22 comments:
Wow! Now that's a makeover! Very cute in it's new paint and fabric.
pk @ room remix
Beautiful Met Monday post! I really LOVE how you repurposed the old chair! Sorry to hear about your back.. I am recovering from a lower back injury myself and I am lucky enough NOT to have to get surgery... Good luck and take care!
Have Fun~Happy Fall...
~Really Rainey
I love the style of the chair with the big "X"s on the sides. And the fabric you chose is perfect! Love it!
Oh the beauty that was left in that chair just waiting to be reclaimed. It is fabulous.You make it sound too easy! Kudos to you!!!
wow, that chair is gorgeous! hope you are feeling better soon. I have a project you can do lying on your back over at thecraftmonkey.blogspot.com, you only have to fold pages! :)
Wow - I am impressed. You did a great job. Hope you get to feeling better soon.
Wow that looks great! I wouldn't never have thought to take something off it's rocker! LOL
I have a linky party going on, come on over and link up! http://theshadesofpink.blogspot.com/2009/10/room-month-great-pumpkin.html
Very nice, love your choice of fabric. Good luck on Friday.
~ ~Ahrisha~ ~
OMG! That is fabulous! Did you actually sew that cover? It just looks awesome...
Oh I love what you did with that chair!!!!!!!!! Love the lines and the detail and they really stand out in white! ~ Ashley
I love it's new color! And the photo where you had them both. Sorry about your back. I have had issues before with mine and it's just NO fun.
Wonderful!! I sooooooooo love the finished product; amazing. Hmm, I was confused if you have had or are having back surgery?
nannykim from SPINDLE COTTAGE
yes, I did have surgery for a herniated disc (last Friday) but I'd taken the pictures for this last week and then managed to get it up on my blog for the pictures for my family to see :)
wow--I hope you are feeling better soon and that the surgery works!!
Ok - YOU REALLY made it over! When I got to the picture of all the upholstery off, I was like - SHE WENT FOR IT!!! Then I cheered all the way to the finish. It's PERFECT! Love your header! I grew up in San Angelo, but lived with my father for 6-weeks in Dublin, and went to Dublin HS for the same short time. I still want to go back and tour the Dr. Pepper bottling co.
Oh my gosh! This transformation is CUTE, CUTE, CUTE!
Oh, wow! I would not have believed it was the same chair! Super good job. Thanks for the comment on my burlap sacks. I got them at a coffee plantation in Kauai during a family trip there in 2005. I've not been able to find any others at the low price of $5.00! What a steal, huh?
Man, that's a comfortable sit.
It's beautiful, I got your link for this chair from comment made on TDC's site - I wish you had a picture of the back! Nice work!
I will take a picture of the back and add that soon too, thanks for visiting.
Hi! I'm tackling a very similar project and have been hemming and hawing on how much fabric to purchase. Did you find that you had enough by just using the measurements from the old pieces or did you end up needing more? I keep reading that 5 yards is the minimum needed for chairs like these... just seems to be too much. Any help would be GREAT!!!
(GORG chair by the way!)
and to answer Annie's question above I used 3 yards (had a little left over).
Post a Comment